Sunday, January 31, 2010

Ginger, Lemon and Garlic Chicken


Lemon, ginger and tons of garlic...how can I go wrong?  This turned out to be some of the best chicken I've ever made.  I found the recipe on Cinnamon Spice and Everything Nice.  It was juicy and tender and full of flavor.  I paired it with some buttermilk mashed potatoes with parmesan cheese.  I sliced some baby spinach and mixed it in the potatoes.  It was a terrific meal!


Ginger Lemon Garlic Chicken

(by Reeni)

1 and 1/2 pounds boneless Chicken Breast or 2-3 large bone-in Breasts
Sea or Kosher salt and fresh black pepper
2 lemons*, one of them juiced, the other sliced
1 teaspoon Dijon Mustard
1 teaspoon Worcestershire sauce
12 large cloves of garlic, sliced lengthwise
1-inch of fresh ginger, minced
1 teaspoon Oregano


1. Preheat oven to 425 degrees. Prepare a 9x13 inch baking or casserole pan by spraying it with oil or first lining it with aluminum foil, then spraying with oil.

2. If using boneless breasts pound out with a mallet or skillet until about 1-inch thick. Season with salt and pepper. Place in pan.
3. In a small bowl whisk together the juice, mustard, and Worcestershire until well combined, Add the garlic, ginger and oregano, whisk. Season with salt and pepper. Pour over chicken and pile the garlic cloves right on top of the breasts. Cover with slices of lemons.

4. Cook the boneless breasts about 25 minutes or until juices run clear, bone-in breasts about 45-50 minutes until juices run clear. Let set for five minutes before serving.

5. Serve with the juices spooned over top.

*Use room temperature lemons. If using straight from the refrigerator microwave for 15 seconds first. Roll the lemon under your palm against the counter top before slicing.

Toasted Coconut Chocolate Chip Oatmeal Cookies


I decided that these are actually healthy cookies.  I changed the recipe and made some substitutions that make me feel a little less guilty about eating them.  I used Eggbeaters instead of the egg and whole wheat pastry flour instead of the all purpose flour.  Also, I used a stick of I Can't Believe it's Not Butter instead of real butter. I found the recipe on The Ungourmet


Toasted Coconut and Chocolate Chip Oatmeal Cookies

recipe from The Ungourmet

makes about 2 dozen

3/4 cup butter, softened
1 egg
1 tsp coconut extract
1 tsp vanilla extract
1 cup packed brown sugar
1 3/4 cups flour
1 tsp baking powder
1/4 tsp baking soda
1/2 tsp cinnamon
1/2 cup toasted shredded coconut
1 1/2 cups chocolate chips
2 cups rolled oats


In a small bowl whisk together the flour, baking powder, baking soda, cinnamon and coconut. Beat butter for 30 seconds until creamy. Add the egg, extracts, and sugar. Mix well. Add the flour mixture to the egg mixture and mix well. Fold in the chips and oats.

Place tbsp sized scoops on baking sheet. Press down each scoop just a bit. Bake in a 375 degree oven for 10-12 minutes.


Friday, January 29, 2010

Blueberry, Chocolate and Banana Pancake Squares


I love pancakes and wanted some for dinner the other night but didn't want to mess with it.  I had seen this recipe for pancake squares at My Tasty Treasures and thought it would be easier than making "real" pancakes.  I added a bunch of fruit (blueberries and half of a ripe, smashed banana) and some mini-chocolate chips and used all white whole wheat flour instead of all purpose.  I served it with some turkey sausage links and we ended up having a relatively healthy breakfast for dinner meal. 

Ingredients

¾ cup milk
2 T. melted butter
1 large egg
1 T. sugar
1 cup flour
2 t. baking powder
¼ t. salt


Directions

Preheat oven to 350°. Lightly grease an 8×8 baking dish. In a large mixing bowl, beat together milk, butter and egg. Add sugar, then gradually beat the flour in. Carefully stir in the baking powder and salt. Pour batter into prepared pan. Bake for 20–25 minutes. Serves 4–6


Wednesday, January 27, 2010

Bite-Size Red Velvet Whoopie Pies


Over the holidays I searched many recipes trying to find a cake-like red velvet cookie recipe.  I wanted to make little bite-size red velvet sandwich cookies with cream cheese icing. I tried 3 different recipes before I found the one that was exactly what I was looking for.  The first ones I tried always ended up being crisp and crunchy cookies instead of the mini-cakes I wanted.  Perseverance pays off because I found this recipe at Dinner and Dessert

Once I found the recipe, I needed to figure out how to make them bite size and cute.  Four cookie scoops later I have officially given up.  The teaspoon sized scoop that I finally broke down and bought the other day ($18) didn't work.  The batter was too wet and it just wouldn't come out of the scoop.  Talk about defeated and disgusted!  I tried using regular teaspoons and they just looked sloppy.  The final idea I had was to use a piping bag.  The mini chocolate chips I put in the batter wouldn't go through the Wilton tips I had so I just snipped off the end of the bag.  Worked like a charm! 


So now I have to find a use for the $18 scooper that I bought.  I don't think that will be too hard. 


They turned out adorable and delicious!  The cookies come out of the oven rather crisp but I have found that the day after they take on more of the cake-like consistency that I was looking for. 

We had a covered dish luncheon at school and the theme was "red food". I am guessing due to Valentine's day coming up. This was the reason I had been looking for to make these once again.

Here are the ones I made at Christmas time.  They were very festive.


Tuesday, January 26, 2010

Chicken Enchilada Chili


I found this recipe on A Year of Slow Cooking and instantly knew that it would be in my crockpot in the very near future.  It looked very simple and included common items that I usually have in my pantry.  My crockpot has been used quite frequently lately...not always with great success.  Somehow, the meat I cook tends to be super dry.  The porkchops I cooked last week, I swear, tasted like soy sauce flavored sawdust.  It was awful!  I feel like I am on a losing streak with my crockpot and hoping that this recipe will cause it to end once and for all.  Of course, I won't blame the recipe if it doesn't turn out moist and luscious... because obviously, there is some user error here.  I have no idea what I'm doing wrong.  Cooking it too long....Not putting enough liquid..... I don't know! 
Ten minutes is all it took to mix this up last night.  I threw it all together in the pot and put it in the fridge so it would be all ready to go this morning.  I'm thinking that there is no way the chicken can turn out dry.  There is so much liquid from the enchilada sauce and canned tomatoes that surely.......!  We'll see when we get home today. 

Verdict:
We loved the chili! It was so nice to have a meal ready when we got home.  I only wish I would have had more time to make some corn bread.  That would have made the perfect meal.  I think next time I will also add more spice to it through either more chili powder or the medium enchilada sauce (I used mild). 

These are the tomatoes that I used- they're the only ones I had in my pantry.  I also used black beans instead, because I had some frozen ones that I had made a couple weeks ago.  YUM!  Thank you Stephanie for a great recipe!


Ingredients:

1 1/2 pounds chicken (boneless & skinless, OR fish out the bones and skin after about 4 hours)
1 1/2 cups prepared enchilada sauce (read labels carefully if avoiding gluten)
2 chopped celery stalks
2 (14.5 oz) cans tomatoes with seasoning (your choice: I had garlic and olive oil on hand)
2 (15 oz) cans pinto or kidney beans, undrained (or 1 cup dried pinto beans, soaked overnight)
1 onion, diced (or 1 tablespoon dried, minced onion flakes)
1-2 teaspoons chili powder
1 teaspoon cumin


The Directions:

Pour enchilada sauce and canned tomatoes into the bottom of a 6 quart slow cooker. Add beans, celery, onion and spices. Stir to combine. Place chicken on top.

Cover and cook on low for 7-8 hours, or until flavors have combined. If you are using dried beans, you may need to cook longer to fully soften the beans. Since I was using the chicken quarters I got on sale, I fished out the chicken after about 4 hours, and removed the bones. I then stirred the chicken back into the pot.

Serve with shredded cheddar cheese and a dollop of sour cream, if desired.


Monday, January 25, 2010

Broccoli and Rice Casserole


One of my husband's favorite dishes that I make is broccoli and rice casserole.  I don't make it very often because it usually takes so many pans...I hate doing dishes!  My sister brought up the fact that she still hasn't gotten this recipe from me, so it gave me the idea to make it to go along with my boneless pork ribs tonight (which didn't turn out that great).  We ate Chinese take-out yesterday and had a ton of steamed rice left over so that made the dish much quicker and simpler to prepare. 

The recipe I have used every other time I've made this dish called for Cheese Whiz and cream of mushroom soup.  I'm trying to reduce the amount of processed food my family eats so I decided to take a risk and make my own cheese sauce.  I turned out really good.   I had the can of cream of mushroom ready just in case I thought I needed it.  It needed a little more moisture so I chose to add some more milk instead of the soup.  The resulting casserole was pretty tasty and my husband was happy that I finally made it for him. 


1/2 cup chopped onion
1/2 stick of butter
1/4 cup flour
2 cups milk
3 cups grated cheddar cheese
4 cups cooked rice
4 cups cooked and chopped broccoli


Preheat oven to 375 degrees.  Spray a 9X13 baking dish with nonstick spray.  Set aside.  Melt butter in a nonstick skillet.  Add onions and cook until tender.  Add flour and cook for 2-3 minutes.  Slowly whisk in milk.  Whisk constantly until sauce thickens. Stir in grated cheese until melted and well combined.  Season with salt and pepper to taste.  Mix in rice and broccoli.  If mixture seems too dry, stir in some more milk. Pour into the prepared dish. Cover and bake for 20-30 minutes.  Uncover and sprinkle cheese on top of the casserole and put back into the oven for 10 minutes.  Cook until hot and bubbly. 


Sunday, January 24, 2010

Chocolate Orange Caramel Crunch Cookies


One of my favorite stores is TJ Max.  Browsing their gourmet food aisle, I came across some Ghirardelli chocolate bars on clearance for $1.50 each. 


I thought that I could make some unique cookies by chopping up the chocolate and adding it to some of my favorite cookie dough. 


The result was a tender, rich and delicious cookie with a citrusy, chocolatey sweetness! 


I used another one of the bars to make a filling of sorts and piped a dollop onto the center of the cookie after a dusting of powdered sugar. 


Cookies

1 cup firmly packed brown sugar
1 cup butter, softened
1 tsp vanilla extract
1 tsp orange extract
1 tsp salt
2 cups all-purpose flour
4 Tbsp milk
1   3.5 oz Ghirardelli Citrus Sunset chocolate bar with orange bits and caramel crunch

Filling

1   3.5 oz Ghirardelli Citrus Sunset chocolate bar with orange bits and caramel crunch
1 Tbsp shortening
2 Tbsp white corn syrup
1 tsp water
1 tsp vanilla


Heat oven to 375 degrees.  In large mixer bowl combine brown sugar, butter, vanilla and orange extract.  Beat at medium speed, scraping bowl often, until well mixed (1 to 2 minutes).  In a separate bowl, mix flour and salt together with a whisk.  Reduce speed to low; add flour, and then milk.  Beat until well mixed.  Add chopped chocolate and mix well.  Scoop dough onto a cookie sheet covered with parchment paper.  Bake for about 6 minutes or until lightly brown around the edges.  Cool completely.  Sprinkle cookies with powdered sugar. 

In a microwave safe bowl, melt the other chopped chocolate bar and shortening on low heat.  Stir occasionally until smooth.  Cool slightly.  Stir in corn syrup, water and vanilla.  Spoon or pipe about 1/2 tsp filling into the center of each cookie.

Saturday, January 23, 2010

Homemade Granola Bars


As I have mentioned before, we are trying to eat healthier in our home.  I have been looking for ways to include more whole grains into our diet.  I saw this recipe for homemade granola bars at Our Krazy Kitchen and decided to give it a try.  One of the reasons I loved this recipe is that it was simple.  I can adjust the recipe any way I like. 

I didn't think my son would like it especially since I included craisins, but he did.  The one thing I am going to change the next time I make this will be to use nonfat sweetened condensed milk.  I want to lower the fat that the first batch had.  I'm not sure if it will work or not, but I think it will be worth the try.  I also bought some dried blueberries today that I will trade for the craisins. I'll let you know how it goes!  I am excited about experimenting with this recipe. 

Update***  The blueberries were very sweet and perfect with the chopped cocoa roasted almonds I used in my second batch.  What to try next....hmmmmm......

Printable Recipe

Ingredients:
3 cups oats
1 can condensed milk
1/4 cup craisins
1/4 cup raisins
1/4 cup chocolate chips
1/4 cup flax seeds
1/2 cup sliced almonds
1/2 cup shelled sunflower seeds
2 teaspoons melted butter
2 teaspoons honey


Spray 9x13 pan with nonstick spray, mix all ingredients well and pour into pan, press flat and bake at 350 for 20 minutes or until lightly browned around edges. Flip upside down on parchment paper, let cool for 5 minutes, cut.

Friday, January 22, 2010

Mint Chocolate Chip Cookies


Some may think that mint is only meant for Christmas...not me!  I saw this recipe a couple weeks ago at Picky Palate and knew that I wouldn't be waiting until the next holiday season to bake a batch.  I love the flavor of mint and these definitely packed in the minty yumminess.  Now I just need to give them away before I eat them all.  I have been really good all week with eating healthy (well, except for the trip to the pizza buffet Tuesday night because my electricity went out during the day and ruined my dinner in the crockpot), but I just "needed" cookies tonight. 

1 Cup softened butter
1 Cup packed light brown sugar
1/2 Cup granulated sugar
2 large eggs
1 Tablespoon real vanilla extract
2 1/2 Cups all purpose flour
1 teaspoon baking soda
1/2 teaspoon salt
1 bag Nestles Limited EditionDark Chocolate and Mint Morsels
1 1/2 Cups white chocolate chips


1. Preheat oven to 350 degrees F. In a stand or electric mixer, beat the butter and sugars until light and fluffy. Beat in eggs and vanilla until well combined. In a large bowl, mix the flour, baking soda and salt. Add to wet ingredients along with the chips. Mix until just combined. With a medium cookie scoop, scoop dough onto a silpat or parchment lined baking sheet about 1 1/2 inches apart. Bake for 9-11 minutes or until slightly golden on outside edges. Let cool for 5 minutes on baking sheet then transfer to cooling rack to finish cooling.


3 dozen cookies

Thursday, January 21, 2010

Turkey Pesto Burger with Butternut Squash Fries


We've been eating a lot of turkey lately.  I've made quite a few turkey burgers and haven't quite mastered it yet.  They always turn out on the dry side without a lot of flavor.  These turned out pretty yummy because of the pesto I added to the meat before cooking and the feta, spinach, tomato and onions added afterward.  They aren't the greasy burgers that we love to eat (and suffer from later), but I guess if we are going to choose to eat healthy, then these will have to do. 

The fries are made from butternut squash.  I parboiled them first for about 3 minutes.  Then I took them out and dried them off with some paper towels and then tossed them with some olive oil and a spicy herb mixture.  Next, I spread them out in a single layer on a baking sheet and cooked them at 450 degrees until they got a little charred and crispy. 

My son saw me as I was cutting up the squash and I told him what I was doing.  This was his quote:  "I have never been so unexcited to have french fries!"  He ended up loving them and swore they were sweet potato fries. VICTORY!


Wednesday, January 20, 2010

Whole Wheat Hotdog Twists


One of my main goals this year is to learn some healthy and delicious recipes that will help my family get healthier and more fit.  I am constantly on the lookout for easy recipes that I can make ahead of time and heat up for a meal quickly. A challenge we have in our house is that we are always running late in the morning and that always means that we have to "grab and go."  Poptarts and other packaged products were outlawed in my house long ago.


We love pigs in a blanket in my house.  I've never tried to make them healthy so I thought I would give it a go.  I decided to try turkey dogs which are very low in fat and calories.  I made another batch of the Whole Wheat Master Recipe dough from HBin5 and cut thin strips and wrapped them around the weenies.  In the end, the hotdogs had very little flavor so we added some seasoning to make them a little more flavorful before we cooked them.  They turned out okay, but I don't know that I will make them again.  I am all for eating healthy but I can't sacrifice flavor.  I'll try some other low fat hotdogs next time.  I'm not giving up.....

Oh, and the soup is not even worth writing about.  I had to post the picture because it's one of my best pictures of food I've taken (in my opinion.)  I am working on this skill and hopefully it will get better.  :)


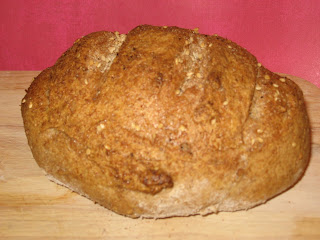
This is my next attempt at making a boule using the Whole Wheat Master Recipe.  It turned out a little lighter than the last loaf and a lot prettier. 

Saturday, January 16, 2010

Bread Baker, not am I....


Several months ago, I joined a bread baking group based on the book, Healthy Bread in Five.  Michelle, at Big Black Dog, is graciously hosting the challenge.  I decided to take the challenge, because I have always had a fear of baking homemade bread.  It just seemed too laborious and difficult.  This week, the challenge was to make a batch of the master whole wheat bread recipe and bake a loaf, a shaped bread and Spicy Whole Grain Snack Crackers.  I have tried several other recipes from the book in the last couple of months and none have turned out well. 


This is the loaf of bread that I made.  My husband and son liked the bread, but I did not. It's too dense and didn't rise like it should have. Actually, it hardly rose at all.


These were the disasters that were supposed to be the crackers. Rolling out the dough was a mess! Then trying to transfer the rolled out dough was impossible. They just ended up balled-up clumps. I attempted to roll them out again and just put the dough on the pan and baked it. I thought some rustic crackers would be good, but they didn't crisp up enough. They were chewy and difficult to eat.


This was the most successful attempt using this bread recipe. My son loves pizza rolls so I decided to try using the dough sort of like pizza dough. They were very tasty, especially when dipped into marinara sauce.


I rolled out the dough and sprinkled mozarella cheese, mini pepperonis, and browned ground turkey seasoned with Italian seasoning.


I rolled it up as tight as I could and sliced it, cinammon roll style. I put them in the pan and let them rest for almost two hours, then baked. They didn't rise much but turned out quite yummy. They worked out perfectly for Cameron to take in his lunch box with a little container of marinara sauce.


I'm not giving up on bread baking or this challenge. I am doing something wrong and I have been reading others' comments and plan on watching some of the videos to figure out how to do things correctly.  I will be posting some new pictures soon.  :)


Sunday, January 10, 2010

Broccoli, Potato and Cheddar Soup


Well, the broccoli and cheddar soup was the winner tonight.  I found this recipe from For the Love of Cooking and decided that it would be perfect for our dinner on this cold and dreary night.  I made quite a few changes to the recipe.  I added some cut up red potatoes with the skins to make it a little heartier.  I  also tasted the soup and it still needed some more flavor.  Not sure what to add, I looked around the kitchen and saw the magic ingredient for my soup.....crushed red pepper.  Last night, we had Dominos pizza and I had some of those little packets of crushed red pepper left over.  I added two of these packets to my soup and it was perfect!  The flavor was incredible now!

 Next, in order to cut some of the calories and fat from the recipe I decided to take a huge risk.  I read somewhere that you can add nondairy creamer to soup to make it creamy so I took the plunge.  I was terrified to say the least that I would completely mess up my pot of soup that I had going.  The recipe calls for 3 cups of 2% milk, so I substitued one cup of milk with nondairy creamer.  I kept waiting for my soup to curdle or turn into a lumpy, disgusting mess, but it never happened.  It actually worked and I have to say, this was one of the most delicious soups that I have ever made or tasted for that matter. 

***update***  So, I told my husband about the substitution of nondairy creamer for the milk.  He asked me what nondairy creamer actually was if it is "nondairy".  I wasn't really sure, so I googled it and found out that I won't be cooking with it, or using it, anymore.  It listed all sorts of ingredients and chemicals that didn't sound that appetizing.  I have been trying to cook and eat healthier (before the holidays anyway) and eat more natural and unprocessed foods, so this nondairy creamer goes against all of that. 

So back to the fattening milk.....  Maybe I will try the 1%, soy or rice milk.  I bought some soy milk and then later found out that males should not consume soy because of all the female hormones it contained.  What to do now???

Printable Recipe

• ½ cup finely chopped onion
• ½ cup chopped carrots
• ½ cup chopped celery
• 3 tbsp olive oil
• ¼ cup flour
• 2 tsp chicken bouillon granules
• 3 cups milk
• 1 tsp garlic powder
• ½ tsp crushed red pepper
• 4 cups chicken stock
• 2 ½ cups sharp cheddar cheese, grated
• 4-5 cups of broccoli florets
• 4 red large red potatoes chopped into bite-sized pieces
• Sea salt and fresh cracked pepper
• green onions and grated cheddar cheese for garnish

Heat olive oil in a large Dutch oven over medium heat. Add onions, carrots, and celery and sauté for 3 minutes. Add flour, stir and cook for a few minutes. Slowly add stock and milk, stirring constantly until thickened. Season with salt, pepper, garlic powder, and red pepper. Add potatoes and cook for about 10 minutes. Smash some of the potatoes with a potato masher. Add broccoli and cook for 5 minutes or until tender. Stir in cheese. Garnish with green onions and cheese.

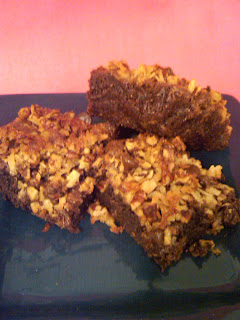
Coconut Pecan Brownies


I spent hours yesterday browsing food blogs. I wasn't looking for anything in particular and I came across a blog that is my new favorite, For the Love of Cooking.  I saw these brownies and knew that I had to make them.  All of my favorites - coconut, pecans and chocolate.  I decided to make them and send them to work with my husband (so I don't eat them all myself).  I did keep 3 for home.  They are very rich and delicious. I added some chocolate chips to the topping...you can never have too much chocolate.  I think I may cut the topping recipe in half next time.  It was a lot!  Not that it wasn't yummy and I am one that usually believes that more is better, but it was a lot of pecans and coconut.  I don't think it was all necessary. 

Saturday, January 9, 2010

Black-eyed Pea Soup


My earliest memories of New Year's Eve are of my cousins, brother and I spending the night at my grandmother's house.  We would stay up all night playing Monopoly and would go out to her car and honk the horn when the clock struck midnight.  She would always make black-eyed peas for New Year's Day, because it would bring good luck in the new year. 

I decided that I would attempt to make some black-eyed peas this year.  I browsed for a recipe because I wasn't quite sure how to cook them.  I found this recipe for black-eyed pea soup that sounded quite yummy and decided to give it a try.  I honestly thought that I would be the only one eating them, but both Cameron and Danny loved them.  Cameron wanted a second bowl!  Needless to say, I was completely thrilled.  There is little that pleases me more than for someone to truly love something that I have cooked or baked.  It's kind of a rush.  It's even better when I create something myself that didn't come exactly from a recipe.  I did start with the recipe I found on the website, A Year of Slowcooking, but changed up some ingredients based on what I had in my refrigerator and my new love of poblano peppers.  These tasty peppers have been finding their way into a lot of my cooking lately. They have great flavor and add just the right amount of heat. 


Ingredients:

--1 pound dried black eyed peas
--1 pound spicy sausage (Andouilli)
-- 5 cups chicken broth
--1 yellow onion, diced
--1 cup diced carrots
--1 diced poblano pepper
--4 cloves garlic, diced
--1/2 tsp Mexican seasoning
--1 tsp kosher salt
--1/2 tsp black pepper
-- 4 slices of bacon
-- cilantro chopped


The Directions.

Soak your beans overnight. Drain and pick out the undesirables (broken, discolored beans) in the morning.
Use a 5 to 6 quart crockpot. This will serve about 8 people. Dice the veggies, and dump them into your crockpot with the pre-soaked beans. Add sliced sausage. Pour in broth, and stir in Mexican seasoning, salt, and pepper.

Cover and cook on low for 8 hours, or on high for about 6. Before serving, use a stick blender to smash up about 1 cup of beans. If you don't have a stick blender, scoop out 1 cup of beans, blend them in a traditional blender, and add back to the soup. Don't blend too much---just enough to get the broth thicker and creamy-looking.

Ladle into bowls, and add cilantro to taste.

Pumpkin-Swirl Brownies


This recipe is actually what fueled my new obsession with food blogs.  I was looking for pumpkin recipes and found this blog, Culinary in the Desert.  The recipe for Pumpkin-Swirl Brownies looked unbelievable so I started browsing and I found many other recipes that I knew I would have to try.  I doubled the recipe and it make gigantic, thick, rich brownies that were loved by most that tried them.  The cayenne pepper gives an unexpected heat that made me want more.  My 3rd graders actually loved them and requested them for a special reward day we had planned.  I made two huge batches of these over the holidays.

Stuffed Shells


Cameron and I watched Cooking Yourself Thin (one of my favorite new cooking shows) the other day and they cooked Stuffed Shells. Both of us thought that it looked very yummy so I decided to cook it tonight. He came in the kitchen and asked me, “ugh, what’s that green stuff?” Of course he saw the same show that I did, but I guess he completely blocked out the whole zuchinni and spinach part of the recipe. AND Danny came in and saw the zuchinni and asked, “What are you going to do with that?” When I told him that it’s going in the pasta he was shocked and I think not real excited.

Well, it turned out quite tasty and they ate it. Danny actually ate half the pan. Cameron did pick out some of the zuchinni. Next time, and there will be a next time, I will cut the zuchinni a lot smaller. I added two large links of chicken sausage, because I knew that they would freak out if there was no meat.

I have changed the recipe some.

Ingredients:

12 oz. box of pasta shells

8 oz of chicken sausage with spinach and asiago cheese (from Sams)

I jar of Smart Balance pasta sauce

1 small yellow onion chopped

1 small purple onion chopped

2 medium zuchinni (chopped or grated)

1 pkg of baby spinach

2 TBSP of Italian seasoning

salt and pepper to taste

garlic powder

olive oil

2 cups skim milk ricotta cheese

mozzarella cheese

parmesan cheese


Partially cook the pasta shells (about 7 minutes), drain and remove to a pan sprayed with cooking spray. Set aside.

Cook sausage with a little olive oil in the pan until done. Remove and set aside. In the same pan, add the onions and zuchinni, Italian seasoning, salt, pepper, and garlic powder. Saute until softened, but with a little bite. Add sausage and ricotta cheese. Mix thoroughly. Spoon mixture into shells and place in a single layer in a baking dish. Carefully pour the pasta sauce on top. Sprinkle both cheeses over the sauce. Cover and bake for 30 minutes or until hot and bubbly.